Introduction
Many times you struggle mainly on mobile devices to be able to press those small buttons by default, for this reason I share with you the way I develop the buttons for the quantity without the need for any plugin, Well, let’s start.
Instructions
1- The first thing will be to insert the buttons that will be next to the quanty field, to do this copy the following code you can use Code Snippets (Free) or any other plugin to install the code to the entire site.
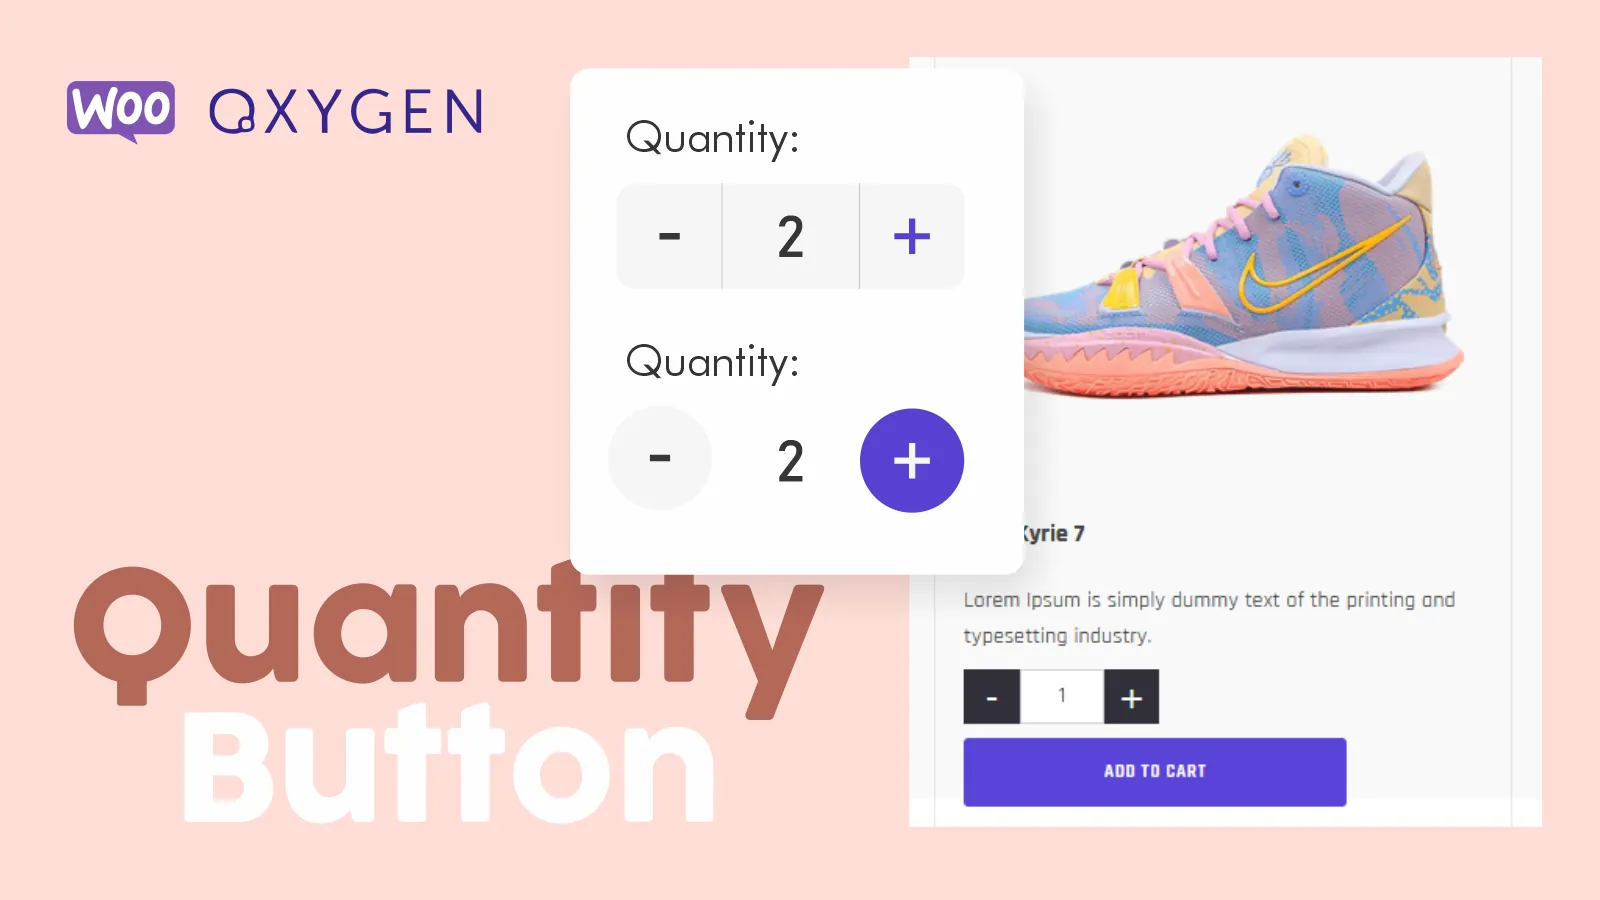
Now if you go to the oxygen constructor you can see your quantities they look like this now

add_action( 'woocommerce_before_quantity_input_field', 'h_quantity_minus' );
//Add Minus quantity button
function h_quantity_minus() { ?>
<button class="h-qty-button h-qty-minus">
</button>
<?php }
add_action( 'woocommerce_after_quantity_input_field', 'h_quantity_plus' );
//Add plus quantity button
function h_quantity_plus() { ?>
<button class="h-qty-button h-qty-plus">
</button>
<?php
}
add_action( 'wp_footer', function () { ?>
<script>

function hfunctionAjax(){
jQuery('.h-qty-minus').click(function () {
var $input = jQuery(this).parent().find('input');
var count = parseInt($input.val()) - 1;
count = count < 0 ? 0 : count;
$input.val(count);
$input.change();
return false;
});
jQuery('.h-qty-plus').click(function () {
var $input = jQuery(this).parent().find('input');
$input.val(parseInt($input.val()) + 1);
$input.change();
return false;
});
jQuery( "input" ).change(function() {
var max = parseInt(jQuery(this).attr('max'));
var min = parseInt(jQuery(this).attr('min'));
if (jQuery(this).val() > max)
{
jQuery(this).val(max);
}
else if (jQuery(this).val() < min)
{
jQuery(this).val(min);
}
});
};
jQuery('.woocommerce-grouped-product-list-item__quantity .qty').val(0);
jQuery(document).ready(function(){
hfunctionAjax();
});
jQuery( document.body ).on( 'updated_cart_totals', function() {
jQuery(document).ready( function() {
hfunctionAjax();
});
});
</script>
<style>

.woocommerce .quantity .qty {
background: none;
}
.woocommerce .quantity .qty input[type=”number”], input::-webkit-outer-spin-button, input::-webkit-inner-spin-button {
-moz-appearance: textfield;
-webkit-appearance: none;
appearance: none;
margin: 0;
display: none;
}
.woocommerce .quantity .qty, .woocommerce div.product .quantity .qty{
margin-right: 0;
}
.quantity {
display: flex;
flex-direction: row;
align-items: center;
}
.h-qty-plus:before {
content: "+"
}
.h-qty-minus:before {
content: "-"
}
.h-qty-button {
display: flex;
align-items: center;
justify-content: center;
cursor: pointer;
}
</style>
<?php } );
Let’s style it
2-Each button has a class that you can style from oxygen for this, we add the classes as follows: At the top of oxygen press Selectors – Add Selector
(Don’t forget to insert the (.) at the beginning)
.h-qty-button (Style for both buttons)
.h-qty-minus (Class for minus button)
.h-qty-plus (Class for plus button)
You can edit the rest with the oxygen settings, but I leave you these classes in case you use them
.input-text.qty.text (Input)
.woocommerce .quantity (input and button wrapper)


That’s all it’s time for you to play with the styles. (Note since this hook is targeting woocommerce inputs the styles and buttons will be added on the cart page.
Leave a Reply